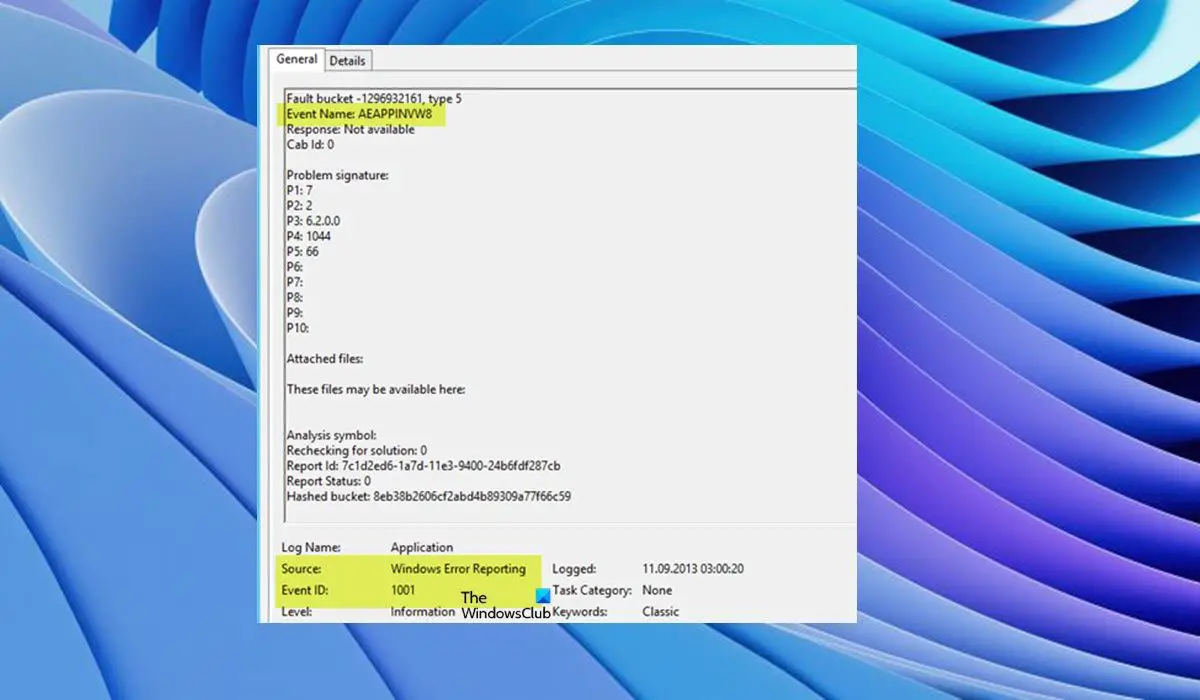
Windows Error Reporting Event ID 1001 is generic, which means it can occur on your Windows 11/10 computer due to several reasons; and to successfully resolve the issue, we have to identify the event name referenced in Event Viewer. This event indicates that an application has crashed the system. The instance of this error will differ to a large extent depending on several factors, including information contained in the log file. The solutions provided in this post apply to the instance of the Windows Error Reporting Event ID 1001 with the following Event Name:
AEAPPINVW8RADAR_PRE_LEAK_64MemDiagV1
The symbolic name for this Event ID is WER_EL_BUCKET_LOG. Code 1001 is like a universal code in case of a Windows error. It represents almost all the main errors like application crashes, lagging systems, generic reports, etc. Read: Windows Errors, System Error Messages and Codes: Complete List and Meaning
Windows Error Reporting Event ID 1001
There is no known adverse effect of this error on the system in terms of performance, security compromise, or general health of the system other than the event log getting flooded with the error. However, if you are looking to stop the Windows Error Reporting Event ID 1001 from occurring and getting logged, you can try our recommended suggestions below in no particular order and see if that helps you accomplish this task. Remember that almost all errors in the Event Viewer log are unimportant – the errors issued are just informative and a report has been sent to Microsoft. We suggest the following course of action: Let’s take a look at the description of the process involved concerning each of the listed solutions.
1] Run Memory Test
The Event Name RADAR_PRE_LEAK_64 or MemDiagV1 are memory issues. RADAR is Microsoft’s Memory Leak Detector that indicates an app or program is not properly handling memory. Some games, such as BlackOps are known to frequently cause the report to be written, and it’s nothing to worry about. However, in this case of Windows Error Reporting Event ID 1001, you can use Task Manager and/or use Process Explorer from SysInternals to identify the app or game that’s having Memory leak issues – it’s imperative to note that some errant memory “tweaking” could cause some memory to become unusable. In addition, you can also test for defective physical memory on your PC with the inbuilt Windows Memory Diagnostic Tool or the advanced MemTest86+. Although this is a software issue, where an app or program is not properly managing its memory, rather than a hardware issue, you can run Hardware and Devices Troubleshooter to rule out faulty hardware, which could be due to either physical damage or corrupt driver/software linked to the hardware. Read: Memory leak issue in Remote Registry Service causes Windows to hang
2] Change Virtual Memory/ Page File
What these errors are is memory errors. The Windows operating system ships with factory default virtual memory. If you have more RAM than factory settings, you need to change your virtual memory to match the physical RAM installed on your computer. To change the Page File size or Virtual Memory on your Windows 11/10 PC, do the following:
In the Taskbar Search, type Advanced System.In the search result, click on View Advanced System Settings. Alternatively, press Windows key + R, then type sysdm. cpl in the Run dialog box and hit Enter to open System Properties.In System Properties, click the Advanced tab.In the Performance section, click the Settings button.In the Performance Options sheet, click the Advanced tab.In the Advanced tab, under Virtual memory, select Change.Now, uncheck Automatically manage paging file size for all drives option.Next, highlight or select your Windows system drive.Select the radio button for the Custom size option.Change the Initial size value and the Maximum size value to a higher value.Click Set.Click Apply to save changes.Click OK all the way to exit.
Read: How to reset Virtual Memory or Page File in Windows
3] Delete/Disable all tasks in the Customer Experience Improvement Program folder in Task Scheduler
As reported by some affected users, the Event Name AEAPPINVW8 is triggered by Windows Automatic Maintenance because they notice the error appears at the time task is scheduled to run. Also, this issue was confirmed or reproduced by manually triggering Windows Automatic Maintenance as the error message promptly appeared in the event log. The scheduled task that triggers the error is called Program Data Update, which is part of the Customer Experience Improvement Program – a task that collects information about software installations, uninstalls, and such. In this case, you can run System Maintenance Troubleshooter to automatically detect and fix common maintenance problems on your Windows 11/10 computer. Also, in Task Scheduler, delete/disable all scheduled tasks in the Customer Experience Improvement Program folder that runs or is triggered at the specified time the error appears and is logged in Event Viewer. – here’s how:
Press the Windows key + R keys to invoke the Run dialog.In the Run dialog box, type taskschd.msc and hit Enter to open Task Scheduler.Navigate to the directory path below:
Task Scheduler Library > Microsoft > Windows > Customer Experience Program Improvement Program
At the location, in the middle pane of the opened folder, select one or more task(s) you want to delete.
Note: If you want to delete or disable more than one task, you can press and hold the Ctrl key while clicking on the tasks one after the other to highlight all.
Once you have selected all the tasks you want to delete/disable, do either of the following:Click on Delete or Disable under Selected Items in the right Actions pane.Click on Action (Alt+A) on the toolbar and click Delete or Disable (Alt+D).Right-click on the selected task(s) and click Delete or Disable on the context menu.Click Yes on the prompt that pops up to confirm.Exit Task Scheduler when done.
Read: How to Import or Export Tasks from Task Scheduler in Windows
4] Disable Automatic Updates
These errors as logged in Event Viewer might also report WindowsUpdateFailure2 or StoreAgentScanForUpdatesFailure0. In this case, what worked is to disable Automatic Updates for Windows and Microsoft Store apps. In addition, you can run the Windows Update Troubleshooter and the Windows Store Apps Troubleshooter to resolve any underlying issues causing both the Windows update and Microsoft Store apps update failures. Read: Recommended Windows Update policies Admins should be using
5] Perform System Restore or Uninstall update
Some PC users reported they started seeing this error entry in event logs after successfully installing a new Windows update on their system. If you’re in a similar situation, then the applicable solution here is to either perform System Restore or uninstall the ‘problematic’ update. If the update installed is a Windows optional update for the driver of particular hardware on your computer, like the graphics card, you can roll back the driver updates in Device Manager. Read: Bad GPU Driver Update causing problems in Windows I hope you find this post informative and helpful! These Event IDs-related error posts might interest you:
DistributedCOM error 10001, Unable to start a DCOM ServerHow to fix DCOM Event ID 10016 error on WindowsEvent ID 10010, Server did not register with DCOM within timeoutHow to fix Event ID 642 ESENT error on Windows
What is a Fault Bucket error in Windows 10?
On a Windows 11/10 computer, a Fault Bucket identification number is a number assigned by the system to identify specific types of errors. This number is used by Microsoft to identify a particular program error when you send an error report. Read: How to read Windows Defender Event Log using WinDefLogView
What is CbsPackageServicingFailure2?
One of those is the Windows Event Error CbsPackageServicingFailure2. The only way users find out about this error is by going to their Windows logs. It is thought to be a system problem potentially caused by the Windows update cache that initiates repeated downloads and installations. Affected users reported that the error did not affect the regular use of Windows on their devices.
How do I view Windows log files?
To view the Windows Setup event logs on your device, follow these steps:
Start the Event Viewer.Expand the Windows Logs node.Click System.In the Actions pane, click Open Saved Log.Locate the Setup.etl file. By default, this file is available in the %WINDIR%\Panther directory. The log file contents appear in the Event Viewer.
Read: What or Where is CBS.log? How to read CBS.log file in Windows
Does Windows have a crash log?
When your hardware or software of the system crashes, hangs, or freezes then the operating system generates and maintains a crash log record to identify the causes of the crashes. Windows operating system maintains this log in Event Viewer. At any time, you can review and as well clear the Event Log in Windows 11/10.